Breeding management
The winter period
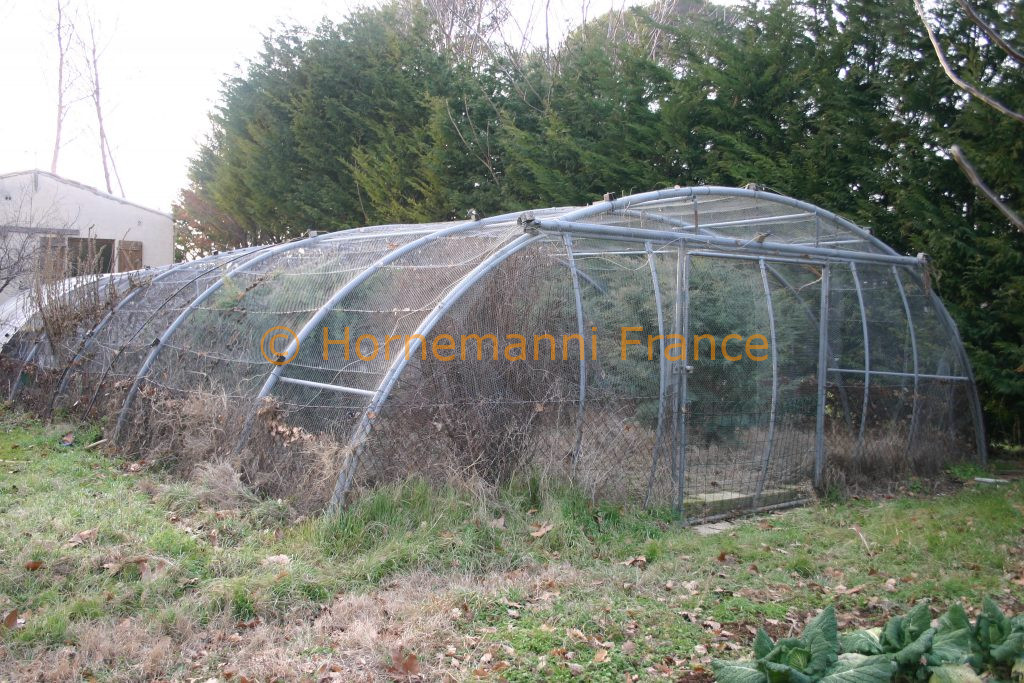
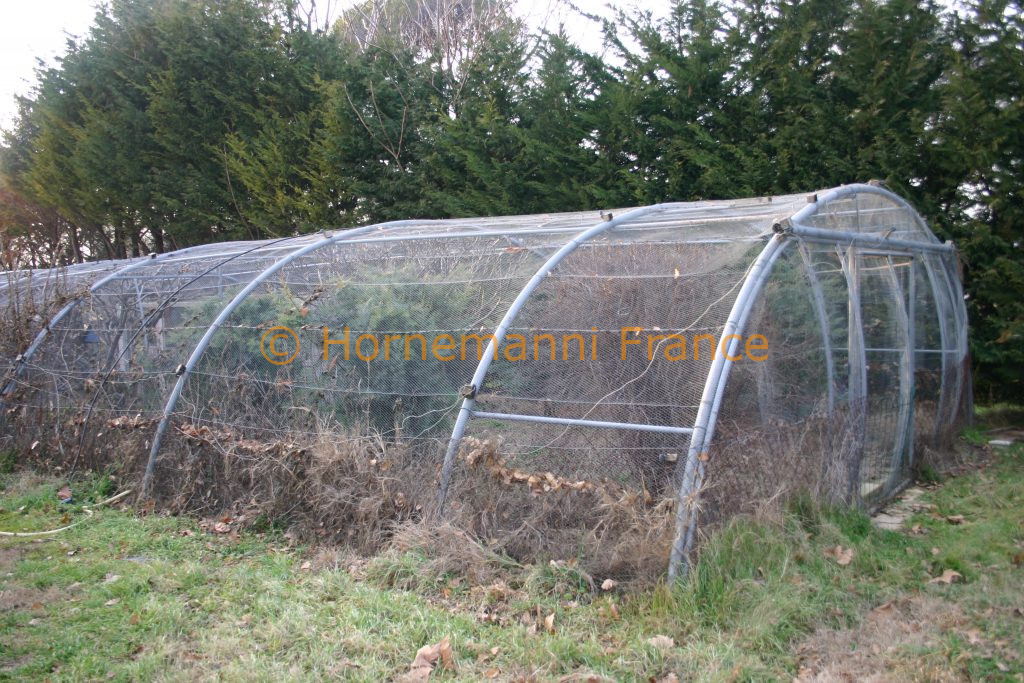
From late October, early November to early March, the breeding males are separated from the breeding females. The Greenfinches are then placed in spacious aviaries where they will spend the winter.
The end of October is also the best time to order coloured aluminium rings. The birds destined for shows have already been in their breeding cages for a good month and are quietly preparing for the big events. At the end of the show period, they will also be released into the aviary after a vitamin treatment.

Example of an outdoor aviary
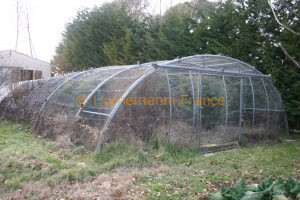
Example of an outdoor aviary

Example of an outdoor aviary

Example of an outdoor aviary

Example of an indoor aviary

Example of an indoor aviary
During this period, and particularly if the birds are housed in unheated premises, it is advisable to give them a more enriched diet than usual.
To supplement the seed mix, small black sunflowers and red millet in bunches can be fed regularly. Once a week, the birds are given a dry feed enriched with morbid pearls, vitamins and trace elements. In winter, storing morbid pearls mixed with the rearing feed does not pose any conservation problems. Fruit or certain grasses can be fed in small doses if the weather is good. Depending on the weather, and in recent years due to global warming, it is not uncommon to find some plants that can be fed throughout the winter. From the end of February, you can even find chickweed and dandelions in the South-West.
In February, a 5-day course of anti-coccidial medication is recommended. Many products are available on the market, most of which require a prescription.
Natural products can also be used, but they have no effect on coccidia. Unpasteurised organic cider vinegar can be used. The dose is 1 tablespoon per 1 litre of water for 5 days.
In very cold weather, a glucose-based food supplement is particularly recommended.
Grit and dry bones are always present in aviaries.
Particular attention should be paid to the humidity level in the aviary, and if the birds are housed in an outdoor aviary, care should be taken to ensure that they have a place sheltered from the wind and bad weather.
The winter period coincides with the major cleaning period. It is preferable to provide an aviary or two, depending on the number of birds, to allow the premises and facilities to be washed and disinfected in rotation.
To treat external parasites and eliminate the risk of mange, it is advisable to apply two drops of a dilute ivermectin solution to the inside of the wing on the forearm. A dropper or cotton bud should be used for the treatment. Be careful, however, not to exceed the indicated dose. Overdosing will result in the death of the bird in 2 out of 3 cases. For mange, I apply the drops directly to one of the affected legs.
This is also the ideal time to improve the facilities, wash and repair the equipment, and think about where to place the birds for the next season. In this respect, it’s advisable to plan several breeding schemes, plan B or C style, because winter is long, and only birds in perfect condition will be bred.
Breeding pairs are formed in February. Breeders need to take a number of parameters into account when making their pairings.
Size and shape:
It is important to choose birds that are either complementary or of a size and shape that conforms to the standard. Don’t forget that a greenfinch is a robust bird.
Plumage:
You need to take into account the structure of the feathers and observe your birds carefully. A long feather or schimmel should be mated with a short feather or intensive, or even semi-intensive. Canary breeders are very familiar with this principle. In European passeriformes, however, and in particular greenfinches, the notion of intensive and schimmel is much less familiar.
Two long-feathered birds bred together can produce offspring with even longer feathers. From schimmel to schimmel, you end up with birds with loose feathers on the flanks, chest openings, faulty thigh and leg cover, and even lumps typical of posture canaries. Lumps are follicular cysts comparable to ingrown hairs in humans. As the feather grows, it does not develop outside the bird’s body and forms a ball under the skin. This type of condition can lead to infection and the eventual death of the bird. If a greenfinch has follicular cysts, it should not be used for breeding. This condition, which is common in posture canaries, is very rare in greenfinches. As a preventive measure, daily baths help to soften the skin and encourage feather growth.
Colour:
For ancestral-coloured birds, it is important to breed bright birds that are not dull. Dull plumage can also indicate a lack of food or a general condition problem. Ancestral females generally have a lot of brown phaeomelanin. Males have a much greener, brighter plumage. However, young first-year males often have much more phaeomelanin than adult males. Depending on your choices and objectives, you can create male or female lines.
Male lines are created from females with as little brown as possible. Female lines will be created with very brown females and males tending towards black-brown.
For mutations, birds need to be bred according to the desired objectives. What is true for ancestral phenotypes is also true for mutated phenotypes and genotypes. You can create your own male and female lines. It is therefore important to know the phenotype and genotype of your breeding stock, not forgetting the family relationships. A family tree can be very useful when you want to fix a trait. Beware, too, of unadvisable matings. A future article will be devoted to this subject.
Grooming:
We recommend that you trim the ends of your birds’ nails to make mating easier. A male with long fingernails will find it difficult to impregnate a female, and if his fingernails are pointed, the female will shy away from him when he plants them on her back. The female with long nails will be much less stable on the perches, and if her nails are pointed, she may scratch her eggs during incubation.
Preparing to breed
It is now early March. The sun rises two minutes earlier each day and sets two minutes later on average. If you are breeding indoors, the dimmer switches are set to match the duration of the outside light.
The Greenfinches and their caretaker are getting impatient. The facilities are clean. The birds are in pairs in the small aviaries. In the larger aviaries, the 4 to 5 female greenfinches are courted by the selected male. The breeding season is approaching.
There are more and more wild grasses in fields and gardens, especially chickweed and dandelion. The males let out joyful trills and stretched, whispering “chuiiiiiiii” notes. Some females begin to carry feathers collected in the aviary or twigs and fine dried rootlets. The feeders are regularly emptied of their seeds to make room for these twigs. The females are preparing to nest.
The mistake here is to rush and install the nesting boxes in a hurry. While the females are starting to get ready, the males are not. The males are in fact ready to breed around three weeks after the females. This explains why, when the breeder is in too much of a hurry to install the nests, he often finds that most of the clutches are clear. However, it is important to be aware that slowing down females to breed and trying to make them wait can fail and end up with clutches in the feeders or on the floor of the aviary.
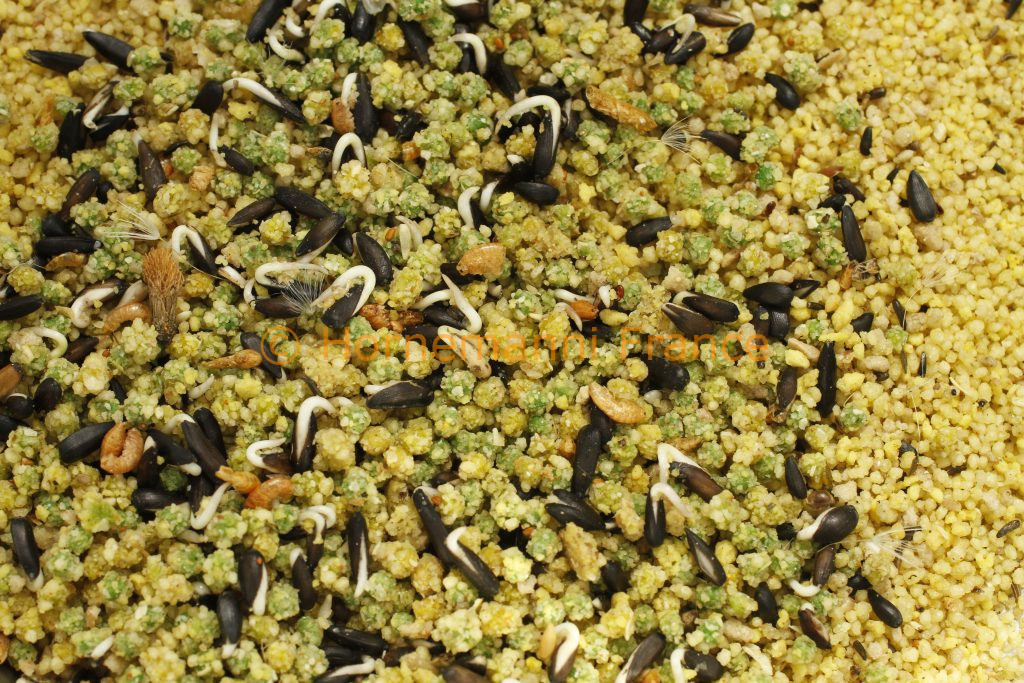
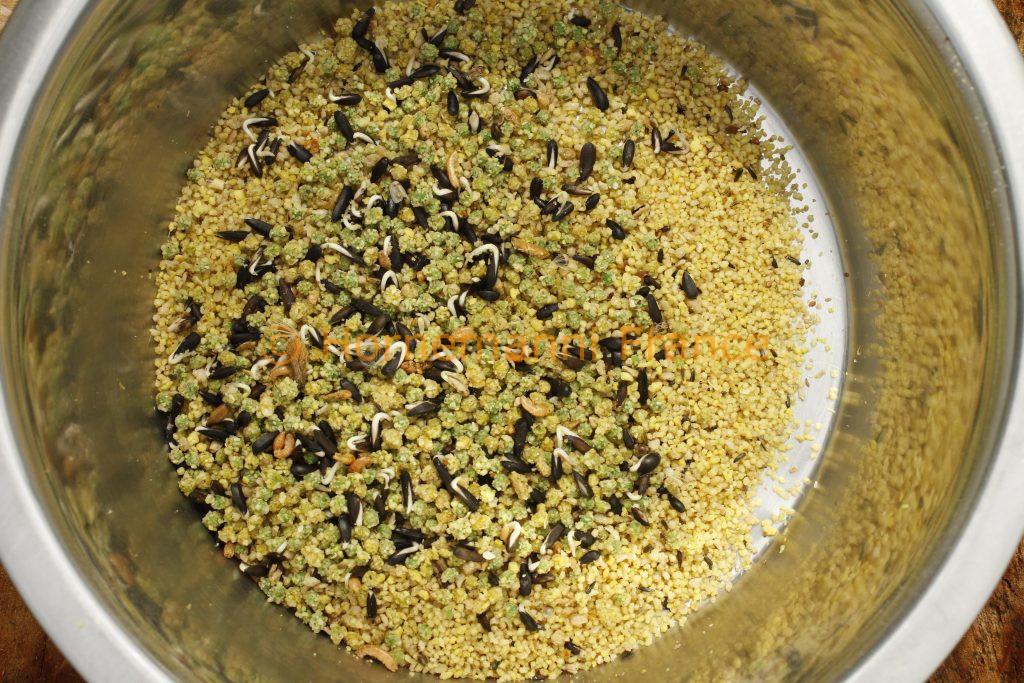
It is therefore advisable to refine the preparation by distributing a dry pâtée, with added vitamins E, trace elements and vitamins . all supplemented with morbid pearls or sprouted seeds. Give the greenfinches this food every day until the first egg is laid.
An important precaution is not to overdose on vitamin E, as the consequences would be that the birds, particularly the males, would destroy the nests, prevent the females from brooding, break the eggs and even eat them, and kill the young chicks when they are born.
In addition to pâtée, ripe and semi-ripe grasses can be distributed to the birds, subject to the precautions to be taken when picking them. An article on this subject is in preparation.
Personally, at the end of March, as a general rule, I decide to install the nests. I hang wooden boards in the aviaries, to which metal nests are attached. Bunches of cedar or broom, also fixed to the wooden supports, camouflage the future nesting sites. Inside the metal or wire nests, a hemp cup is laid down to enable the birds to assemble the structure of their nest more quickly and easily.
Breeding in pairs or polygamously?
I’ve been breeding birds using both methods for years.
In pairs, in small aviaries or spacious cages, you have to be vigilant and watch the male’s behaviour. If he gets too excited by taking too many vitamins, he may chase the female away, destroy the nest, break or eat the eggs and kill the young when they hatch or the day before they hatch. Fortunately, these disastrous scenarios should not be generalised, and very often the male will take perfect care of his female. However, if you do come across such behaviour, don’t hesitate to separate the male from his female the day before hatching. Place him in a display cage inside the aviary. This way, the female will hear him and continue to see him. Once the egg has been laid, replace it with a dummy egg and release the male with his female. Once the fifth egg has been laid, the male will return to his display cage for the duration of the incubation period, or even longer.
With polygamy, i.e. one male with 5 or 6 females, depending on the size of the aviary, the problems mentioned above are much rarer. The male has to devote himself to all the females, and expends much more energy. Generally speaking, the females begin to brood one after the other in peace and quiet. However, if a male starts destroying the nests or eating the eggs, there’s no point in insisting and it’s better to replace him and stop breeding.
You should also avoid forming a trio. In this case, the females will mate and the male will be left out. More seriously, either the female or the male will spend his time chasing the other female.
The breeding period
It’s the end of March and the greenfinches are in top form. The males sing and chase the females. The females carry all the materials they need in their beaks to start nesting. It’s time to hang up the nests. Artificial and natural light gets longer every day. On average 2 minutes in the morning and one or two minutes in the evening. When the temperature is at least 13 to 14°C and the light lasts 14 to 15 hours. Reproduction conditions are ideal.
Once positioned on the support, it is not unusual to see the male moving from one nest to another. Some even leave a piece of grass or a feather, as if to mark the final choice of location.
In my experience, nests are often built during the day. If you have opted for a planted aviary, or if you place faggots of broom or cedar in the aviaries, you will undoubtedly be lucky enough to see a real natural nest being built without any artificial support. This proves that despite decades of captive breeding, the Greenfinch still retains reflexes specific to its species.
In nests with support, I have got into the habit of placing a cut of hemp, used in canary farming, to help the female fix the nesting materials. The base of the nest is generally made of coconut fibres, grasses, rootlets and moss, then lined with softer materials such as goat hair, rabbit hair, cotton (100% natural) and willow cotton. The female puts a lot of effort into building her nest. She often builds it, destroys it, rebuilds it, destroys it, rebuilds it, changes location and finally finishes it in one of the places she has already visited. Sometimes, it is the males who decide to revise the construction of the nest and throw away the materials accumulated by the female. Young females have more difficulty building their first nest. Patience is therefore required.
Once the nest is complete, the first egg is laid very quickly. This is a particularly sensitive time for the breeder, who needs to keep a close eye on the young females in particular. The laying can be anticipated by observing the bellies of the female greenfinches and their behaviour. Some stay put on a perch or a branch, others are already in the nest as if they had started to brood. Depending on the weather, and especially the temperature, it is advisable to be present in the morning when the eggs are being laid. When the first egg is laid, I stop distributing the enriched feed.

The eggs can be removed each day and replaced with dummy eggs. However, they should be placed on a bed of canary grass and turned several times a day.
Parenthesis about egg-laying disease
The major risk is egg-laying sickness. This is diagnosed in the morning. The female is swollen, lying on her perch or even on the ground, her wings sometimes hanging down and her eyes half closed. There is danger! These symptoms can also be observed on the eve of laying, which is even more serious. Labour is under way but is going badly. As the female is unable to evacuate the egg, she becomes exhausted and if the breeder does not intervene quickly, she will die. If you realise the day before that the female is suffering, you should place her in a hospital cage, or a display cage close to a source of heat. The bottom of the cage should be covered with foam to cushion the fall of the egg if it is eventually evacuated naturally. A single perch is sufficient, as low down as possible. Distribute water with a glucose-based mixture to give a stimulating effect. If necessary, put the liquid mixture directly into the bird’s beak. The energy produced by absorbing the glucose, combined with the heat, will allow the female greenfinch to regain her strength and, if all goes according to plan, to lay eggs normally.
If the breeder notices the egg-laying problem too late, i.e. in the morning, as greenfinches lay their eggs between eight and eight-thirty, the egg must be laid. The procedure is not without risk. First of all, you need to take the bird as gently as possible, avoiding compressing the female’s belly. Once in hand, several techniques are possible.
The primary objective is to save the female, so it doesn’t matter if the egg breaks after evacuation. The boiling water pan technique is the most common. Place the bird over a pan of boiling water that releases steam. Test the heat of the steam with your hand beforehand to avoid burning the bird. Keep the bird at a safe distance, with its belly exposed to the steam coming from the pan. This source of heat and moisture will help to dilate the cloaca. Once the belly is heated, pipette in one or two drops of olive oil. You can also use a cotton bud soaked in olive oil. You can also gently massage the female’s belly with the cotton bud, taking care not to press and always in the same direction, towards the cloaca. Once the operation has been carried out, leave the female in the show cage or hospital cage and keep it at the right temperature, 28 to 30°C. Place the cage in a quiet area. Logically, the bird should evacuate the egg a few minutes later.
If, by some misfortune, the egg is broken inside the female’s belly during handling, and she is unable to evacuate it, she will be condemned.
It also happens that some females evacuate the egg stuck to the oviduct. In this case too, the bird’s chances of survival are nil.
Egg-laying sickness is common to all bird species. It is not common in greenfinches, but you should be aware of it and be prepared if necessary.
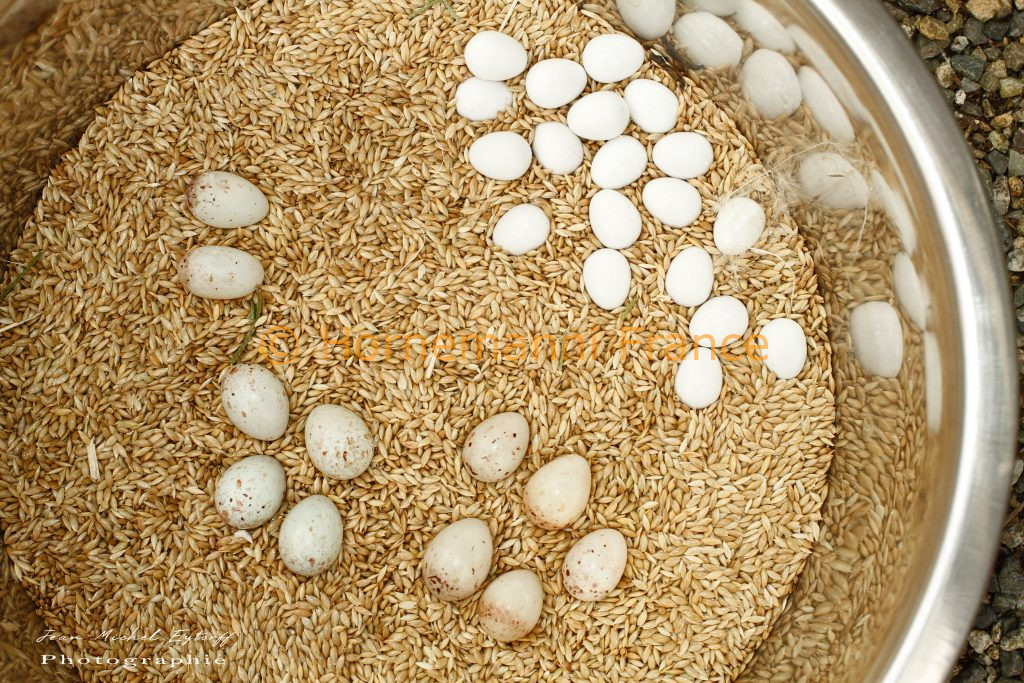
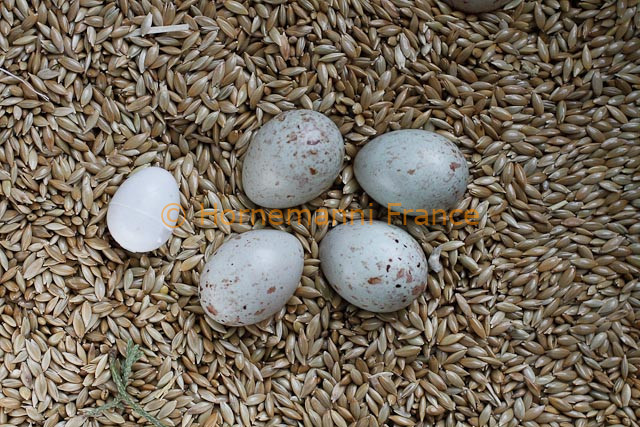
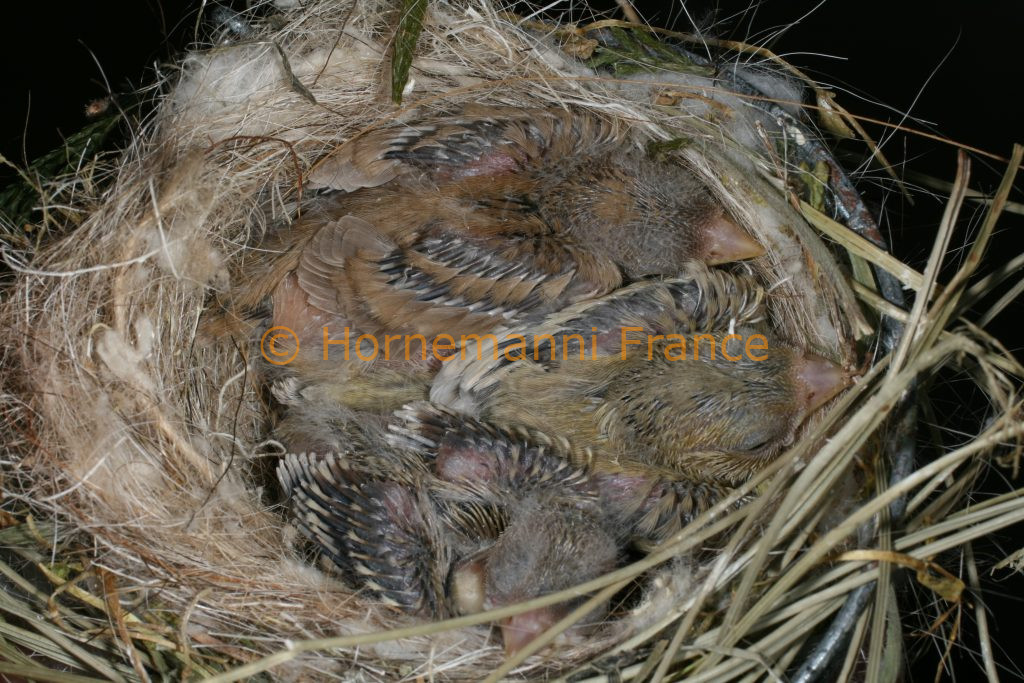
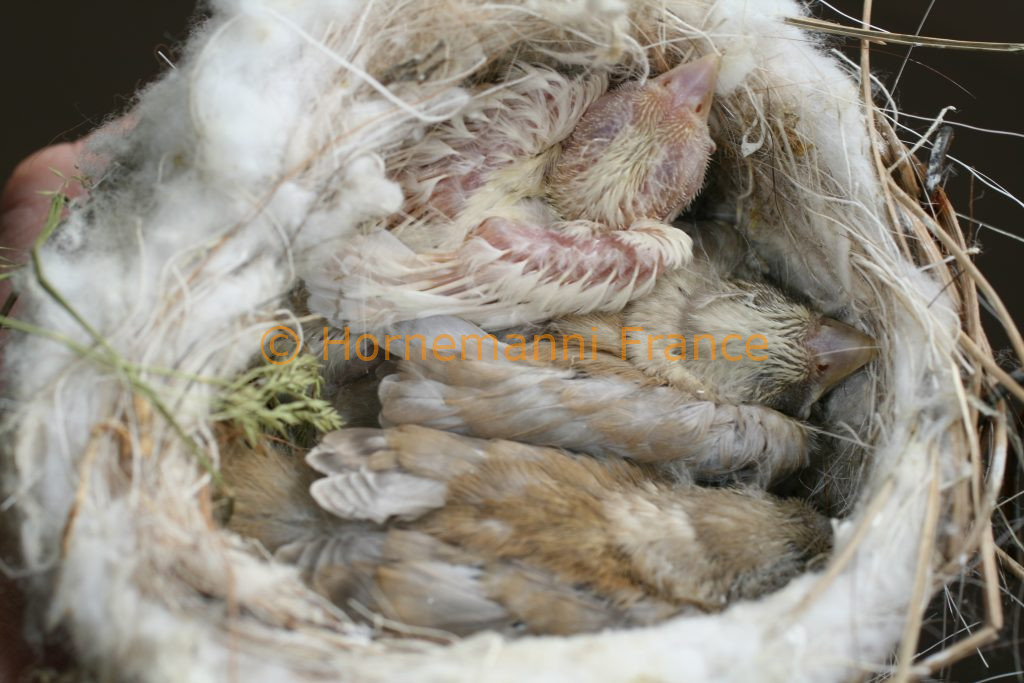
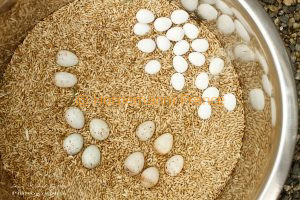
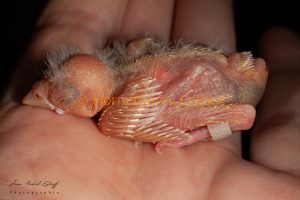
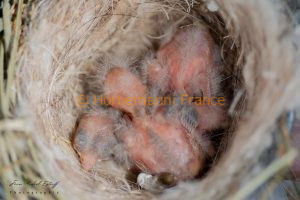
On average, 5 bluish eggs are laid each morning in the nest by the female Greenfinch. Some females are content to lay four eggs, while others lay six. As a general rule, brooding starts as soon as the third egg is laid, but I have observed birds brooding as soon as the last egg was laid, and others as soon as the first egg was laid. Personally, I prefer to leave the eggs in the nest and not replace them every day with dummy eggs until the laying is complete. So I let nature take its course, with the risk that births may be delayed. There can be a 5-day gap between the first and last young birds, in which case the last young bird has little chance of surviving. The solution is to place it in the nest of a female with young of the same age and size, or to supplement its food with a syringe.
Between the 6th and 8th day of incubation, I test the eggs using an egg tester bought from a pet shop. Fertilised eggs are easy to identify. You can clearly see the chick’s blood vessels and the air sac, which will also develop over the days as the embryo grows. The embryo’s heartbeat is clearly visible. A clear egg is translucent. An embryo that is not developing or is dead can be distinguished by a dark spot in the centre of the egg. I take advantage of the mirage to dust the nest and eggs with insecticide powder and protect the female and future young from attacks by grey and especially red lice.
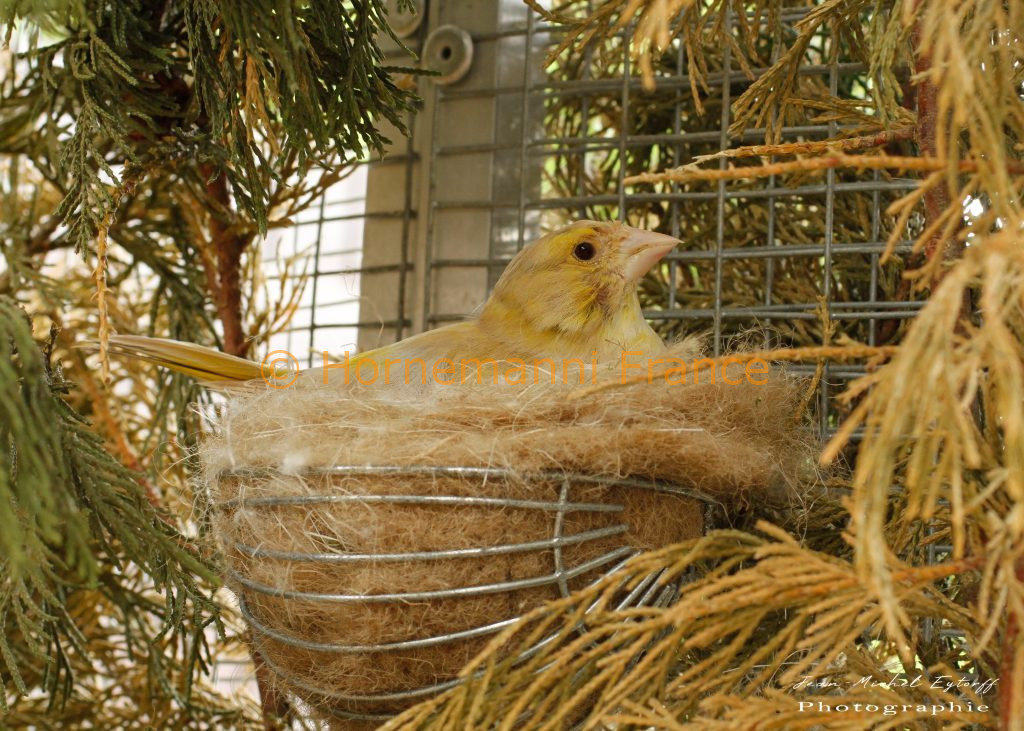
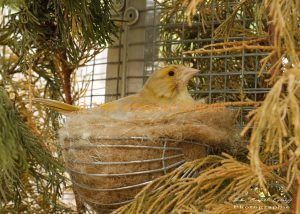
The female Greenfinch broods alone; some males also brood, but they are rare. The brooding period is 13 days. Ideally, the humidity level on the farm should be 65%. Two days before hatching, the eggshell changes appearance and becomes lighter and duller. Light eggs are shiny and dull. The bath is permanently present in the cage or aviary. If the eggs do not hatch, you must be careful and give yourself a few days before breaking them. There is no precise rule about brooding. Some females brood from the first egg, others from the third and others from the last. As a result, it is very difficult to predict the exact date of hatching, especially when nature is left to its own devices.
When the young are born, the female greenfinches, who are particularly clean, take care to remove the shells and place them away from the nest. It is not unusual to find them in the feeder. If this is the case, it’s perfect for the breeder, who doesn’t have to worry about the youngsters being born.
The diet is then as follows: The usual mix of seeds, vitamin-enriched dry food enriched with morbid pearls, defrosted pinckies and small black sunflowers, finger millet, fresh apple, grey perilla and plenty of wild grasses. The first brood coincides with the harvesting period for chickweed, dandelion and the first sow thistles.

morbid pearls, sprouted seeds pâtée


morbid pearls, sprouted seeds pâtée
Young greenfinches undergoing colour mutations: single and double dilutions of yellow beak

Young brown, agate and Isabelle greenfinches

Young Isabelle satin and simple dilutions
At around 15 days old, the young will leave the nest and begin to fly. For the first few days, they will mostly stay on the ground. We recommend placing a tree branch in the aviary so that they can climb branch by branch to reach the upper perches. Leave it to nature, and your chicks will soon be able to perch normally. At the same time, the female greenfinch will leave for a second round, having built a new nest in another nesting box. She will often be disturbed by her young during the brooding period, until they are weaned if they are moved to another environment. The young of the first brood often come to squat in the new nest and often cause a great deal of damage. The eggs may be broken, their droppings may soil the eggs, the female may be so disturbed that she abandons the second brood… In any case, it is important to bear in mind that the priority objective is to ensure the first brood is weaned and not to chase 100% positive results. Amateur breeding should not be practised with quantity in mind, but with quality as a priority. This explains why the second brood is often a failure. The third brood will coincide with the weaning of the young, which will allow the female to brood and rear in peace, provided the male leaves her alone too. When the young birds leave the nest, I usually reduce the amount of wild grasses and stop using sprouted seeds. Otherwise, the young will only eat what they like and what is easy to peck at, greenery and seed sprouts. Such a diet will cause enteritis, weakening the birds’ bodies and generating new diseases such as coccidiosis and, above all, lankesterelosis. I always give the same mix of seeds, dry mash enriched with morbid pearls, and plenty of grey perilla seeds, and of course fresh apples every day.
Greenfinches can breed in a breeding cage. The basic rule is to have breeding stock raised in similar conditions. However, the main difficulty is getting the female to nest. Once the male is in breeding condition, he will mate when the female is ready to breed. The breeder will need to be vigilant, however, because a male in a confined space can, if he gets too excited, disturb the female, destroy the nest, prick the eggs and even kill the young at birth. In such rearing conditions, it is advisable to separate the male after the last egg has been laid, using a wire screen. In this way, the female will continue to see the male and raise her brood alone.
When the young are weaned, it will be time to replace the male with the female. Be careful, though, as the female may lay again at 15 days, when the young are about to leave the nest. In this case, the unfertilised eggs should be discarded, and the female should be prevented from starting a new brood by temporarily removing the nests. Some females stop feeding their young as soon as they start brooding again. In this case, the young greenfinches are weaned after 30 days, so you need to be patient. The principle is to preserve and ensure the results obtained, before trying to obtain a new brood.
Some males immediately agree to feed the young when the separation screen is removed, others do not. It’s up to the breeder to adapt.
Ringing:
Banding is a particularly important stage for the breeder.
Each year, in accordance with the directives of the World Ornithological Confederation, the federations market rings in the colour of the year. The closed ring is the bird’s identity card.
When ringing, which should preferably take place in the evening around 7pm, you should pay close attention to the female’s behaviour, talk to her to reassure her if necessary and above all not panic her. Proceed slowly.
The bands should be covered with flesh-coloured plaster to hide the colour of the band or its shine. If the young birds are banded too early, the females will want to remove the bands from their young birds out of a cleanliness reflex, and sometimes get so angry that they mutilate their chicks and even throw them on the aviary floor. That’s why you need to be careful and band at the right time. It is customary to wait for the first droppings to be deposited on the edges of the nest, a sign that the female is letting her guard down regarding the cleanliness of the nest. This is an indicator, but if the young birds are well fed, their growth makes banding difficult, if not impossible, because of the risk of injuring them.
Banding with a camouflage ring
Banding must be done at the right time, neither too early nor too late…
How do you go about banding?
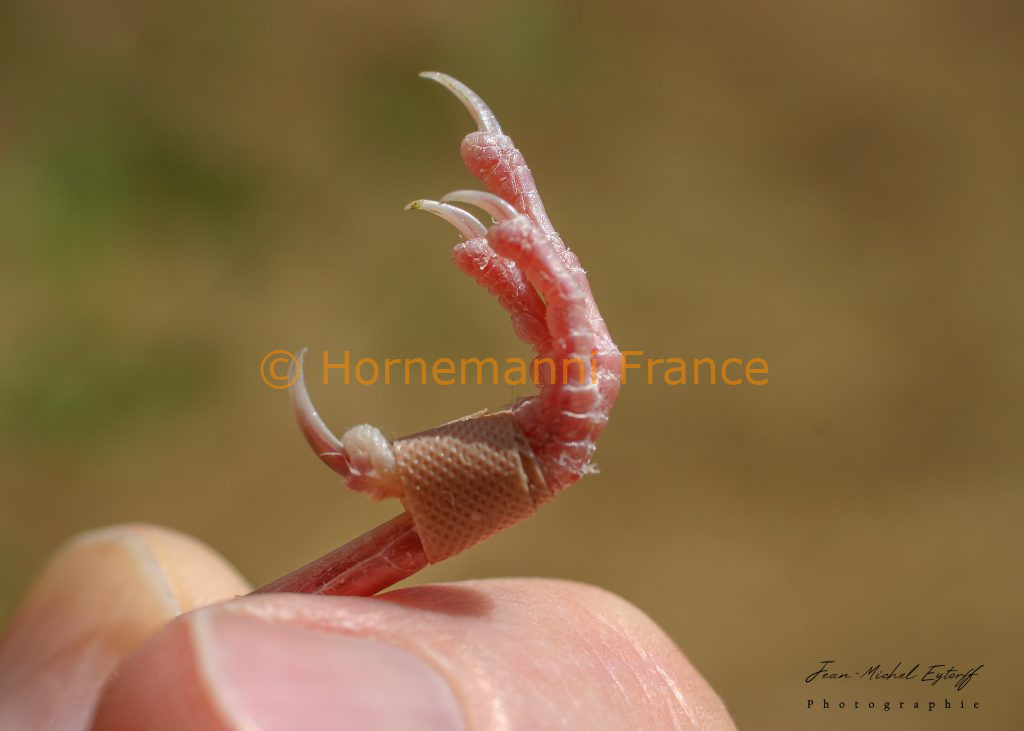
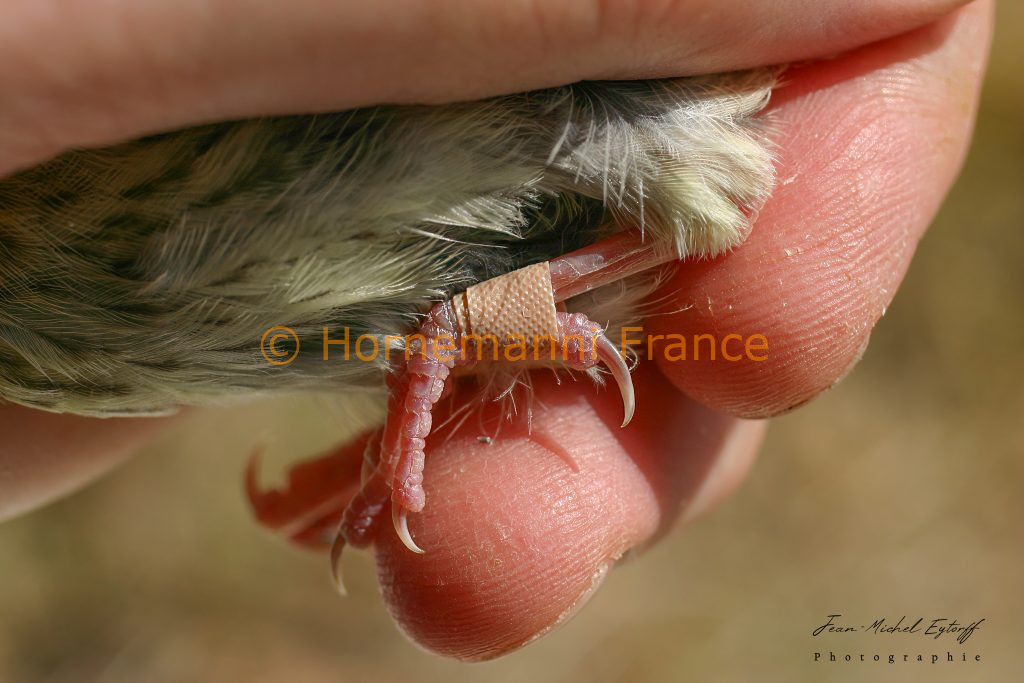
Young greenfinches are ringed around the 6th or 7th day of life. The leg is moistened with a little saliva. The breeder holds the chick’s leg with one hand and puts on the closed ring with the other. The first three fingers are passed through, and then slide over the joint. The breeder must take care to rotate the ring gently, massaging the joint and pulling lightly on the first three fingers. The front toe is then passed over and the breeder must pull the ring up to release it quickly. The ring is then lowered back down the leg and finished off by moving the fingers to check that the joint is working perfectly. To make this last step easier, a toothpick can be used very carefully to slide the band onto the last finger.
![]()
To limit the risks, here are a few recommendations:
- Only band when the female is no longer cleaning the nest perfectly.
- Band preferably in the evening around 7pm. The female will forget the disturbance caused by the banding during the night.
- Camouflage the band with flesh-coloured plaster. The aim is to hide the shine of the band. The best results are obtained by covering the bands with thin, flesh-coloured plaster.
Some breeders use smoky black or black felt for this operation. Having tested different camouflage methods, I think the best results are obtained with plaster.
Ring diameter :
It is essential that it is appropriate for the species or subspecies you are breeding. You don’t band a greenfinch of the auriventris subspecies with the same rings as a Maltese greenfinch. Never band with a diameter that is too small. The ring diameters I recommend using range from 2.9 mm to 3.2 mm.
Accidents when ringing :
- The female unbands her young. When the female wants to remove the band from her young’s leg, she pulls on the band and turns the lower finger over. The injured finger can no longer grip the perch and the bird rests its leg on the bent finger, exacerbating the injury. In this case, the chick’s leg needs to be retrained very quickly. The best results are obtained by keeping the deformed finger raised, using a band of plaster or a cellulose ring. Over time, the plaster will relax and the finger will return to its normal position. This solution has been successfully tried out on several occasions at my farm. Some youngsters have regained normal function of the paw, with no visible deformity. Others retain a stiffness in the lower toe that will keep them out of shows but not out of breeding.
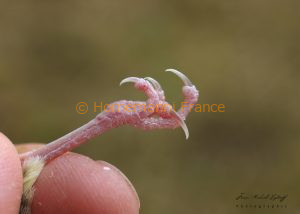
Finger turned over after being unbanded by the mother
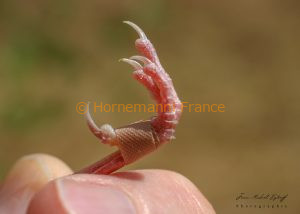
Correction of finger positioning and plaster placement
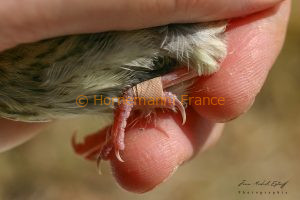
In this way, the chick can position its leg normally on the perch and carry out the rehabilitation itself.
- Young birds thrown from the nest. Accidents rare in greenfinches. More common with Tarins and Bullfinches. The solution: don’t band the chicks too early and, above all, hide the shiny band well. Put the young back in the nest and observe. If the female or male starts up again, plan B is to find an adoptive mother.
- Ring diameter too small. This serious error is caused by a lack of knowledge of the subspecies and the appropriate ring diameter. The solution is to quickly cut the band using a special chisel sold in pet shops. Please note that a bird that has been released and is covered by the regulations must be ringed by an authorised official body with an open band that is glued on after fitting by joining the two ends together.
Weaning young birds
Weaning is THE sensitive, high-risk period for the breeder and especially for young greenfinches. After about thirty days, the chicks are eating on their own. There are several possible solutions. When the aviary is large, you can choose to leave the young in the breeding aviary. They will continue to be fed by their parents, while their mother is rearing the second brood. Operating in this way offers a degree of comfort, but also some inconvenience. In fact, if you treat the young birds as a preventive measure, you will also have to treat the parents.
Ideally, you should house the weanlings in another aviary dedicated solely to the young birds of the year. The food is dry and made up of the usual mix, vitamin-enriched dry mash supplemented with morbid pearls and a little black sunflower, fresh apples and millet in bunches. Between 30° and 60° days, there is a risk of rapid mortality. The bird seems to be in good condition in the morning, but is already infected and emaciated, starts to puff out its plumage at midday, and by the end of the day is lying on the floor of the aviary. This suggests coccidiosis, but above all lankesterelosis. To protect them, the young birds receive a sulphadimetoxin-based treatment in their drinking water. This molecule is available from your vet. You can also use natural thyme-based herbal teas. Personally, I’ve been opting for the first solution for a number of years as a preventive measure against possible illnesses. The symptoms described above are what old breeders used to call “greenfinch disease”, which also affects young birds of the year at the time of the juvenile moult. At the time, 50-70% of young birds died at weaning or during moulting. Today, this risk is limited, provided that preventive treatment is carried out.
Molting
Young birds moult between the second and third month of life. At the beginning of August, the first remiges and rectrices of the adults also fall off one by one, and the moult begins, finishing in mid-September. It’s a good idea to give the birds a multivitamin complex during this period. This part of the year is certainly the most difficult for the birds, whatever the species, and also the most distressing for the breeder. A season’s efforts can be wiped out in just a few days as autumn approaches. Young immature birds are the most prone to problems during moulting. Remember that they have to build up their plumage twice in the space of a few months. Young birds do not normally lose their first remiges or rectrices during the first moult, which is a reflection of their tired bodies. However, this is not always the case, and in some years, depending on the weather and the heat, young greenfinches lose all their plumage. It is advisable not to move them or expose them to draughts during this period. The stress caused by a change of environment will increase their general fragility. It is advisable to leave the young birds in their weaning aviary until the moult is complete. If you notice that a bird starts to puff up its plumage, has a swollen belly, looks sad, closes its eyes or even sleeps during the day, disaster is near. In this case, you need to react very quickly, placing the sick bird in a hospital cage at 30°C, and administering an anticoccidial treatment for 5 to 7 days. Then give the bird a boost by reconstituting its intestinal flora with yeast ultras, followed by vitamins and trace elements. Moulting may also stop in young birds and, more rarely, in adults. In young birds, one or two new coloured feathers appear on the chest, and the moult seems to stop. This process, which I call moult block, is often fatal. A successful moult begins symmetrically on the flanks and ends at the head.
MAIN DIFFICULTIES ENCOUNTERED IN THIS TYPE OF BREEDING –
Aggressiveness on the part of some males, with the male either biting the eggs or eating them:
There are several techniques: separating the male and leaving him in a display cage, injecting clear eggs with a non-harmful product and placing them in the nest. Some use a chilli-based product.
Eggs eaten by the female (no solution!): female unfit to breed. Now, if the bird is particularly important for your breeding: beauty, important genetic capital, rare mutation… there is still the technique of injecting unpleasant products into eggs that are placed in the nest. And if you have the time, you can intervene as soon as the female has laid her eggs to save them and give them to a replacement female.
Mortality of embryos during incubation around the 7th day: fragile embryos in the case of mutations. Bacteria transmitted to the egg by the mother’s droppings. In the second case, an in-depth analysis with an antibiogram may be required.
Mortality in the egg on the eve of hatching: possible in very dry conditions with low humidity.
Mortality of young mutants at birth (fragile chicks with colour mutations),
Difficult weaning, when the male does not feed while the female is brooding again.
Fragility of young during their first winter if it is particularly wet.